Sunday, June 24, 2012

Two Worlds Collide: Washi Tape meets my social life

Just a quick post to share yesterday's revelation:


That's right! Washi tape aint just for crafting!


Much faster to get on than those wine charms, and easy to remove. :)

Sunday, June 17, 2012

Happy Father's Day!

I've been loving the origami t-shirt cards I've seen this year.  I was then inspired by Teally from Two Peas as she posted on her blog the two Father's Day cards she made with Echo Park's This and That paper.  Well, I thought I had that, but found my pack of Note to Self instead and got started.

I looked up the how-to for making the t-shirt, and used the directions here:  http://www.card-making-magic.com/foldedpapershirttutorial.html. I tried it first on a 8 1/2" x 11" sized paper, and found the shirt looking a little stubby for my liking, so I used a 12"x12" paper, and cut it down to 12"x7.5". This left a card that was (at it's widest points) 5 5/8"x 5 1/4". So plan accordingly if you're trying for a specific envelope size. :)

I added a tie made from washi tape and a "No 1" sticker from the EP paper pack.


And for the inside, I added some plain paper to line it and some more EP stickers.


Materials: Echo Park Note to Self paper & sticker sheets, washi tape, plain cardstock

Saturday, June 16, 2012

Page Planning

If I'm going to a crop, I like to plan ahead so that I don't have to bring all of my scrapbooking supplies and the kitchen sink with me. My process has evolved over the years, and now I've expanded it so that I (generally - not always) buy my patterned paper with a specific layout in mind. This has definitely helped keep my pp stash down to a minimum.  (leaving more $ to spend on other stash items, such as stickles, ink, dies, etc, etc, etc :) )

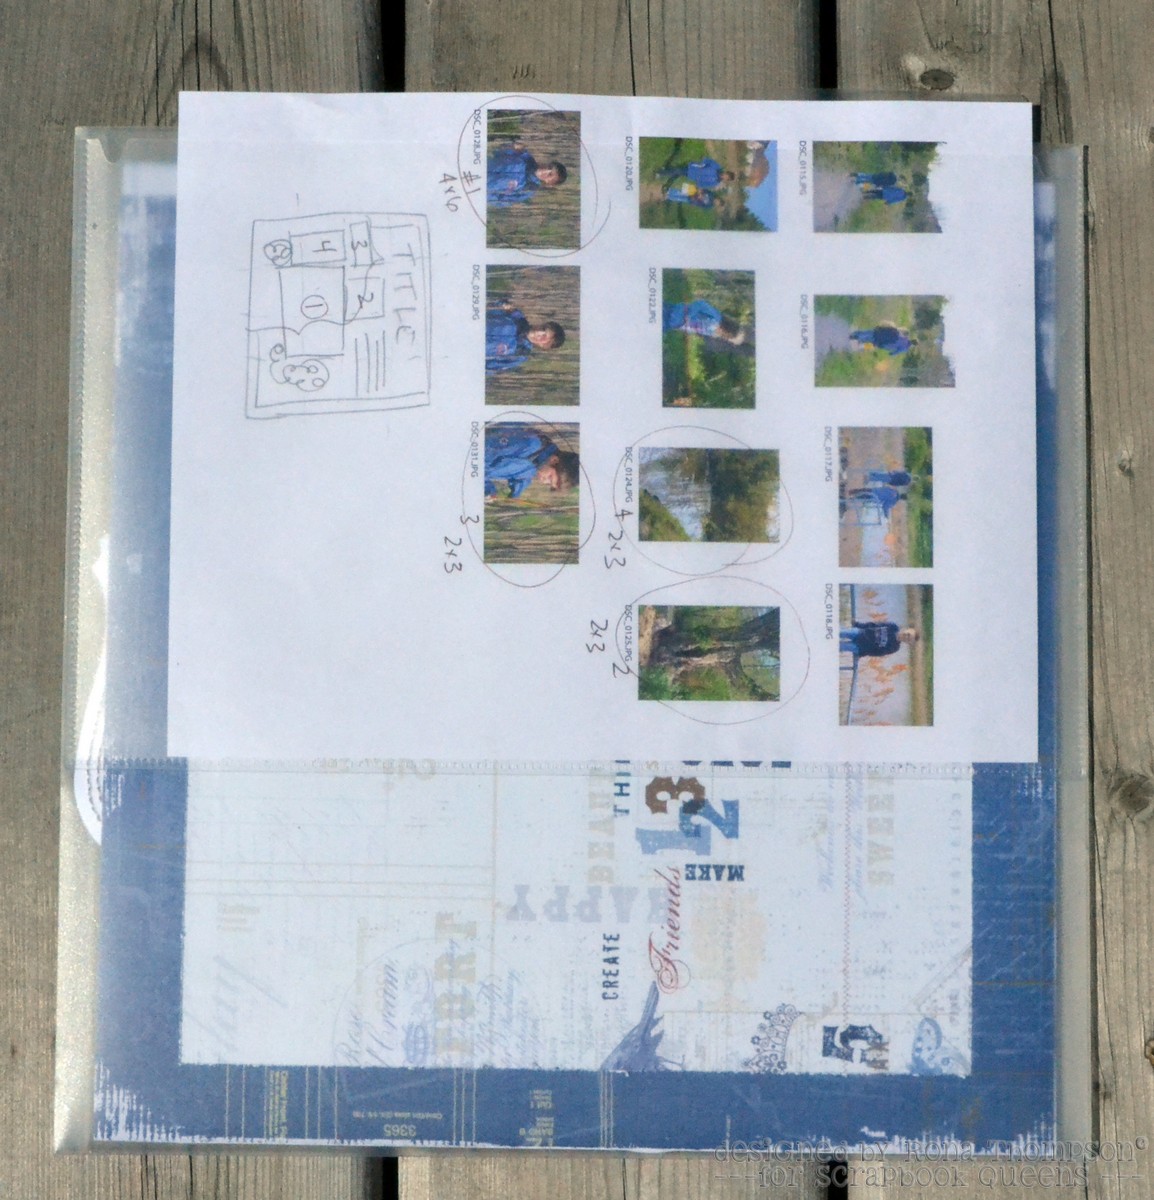
The first thing I do is go to my photos. I have them stored on my computer (with a backup on an external drive, of course). I like to use the organizer built in to PhotoShop Elements. From there, I select the events that I want to scrapbook. Let's say I want to use the photos of my kids down at the stream. I highlight all of those photos and print a contact sheet of them.

In PSE, highlight all the photos, then (right click) Print.
Paper Size = letter
Select Type of Print = Contact Sheet
Show Print Options = turn on "Filename"

I change the number of columns so that the pictures fill most, but not all of the page. I keep the filenames showing so that I can find the photos more easily later on.


If I'm heading over to my LSS (Scrapbook Queens) for a little retail therapy, I'll take a few of these contact sheets with me, so when I buy my patterned paper, I have the photos to match up to. Usually 2 pieces of patterened paper, and a couple of sheets of cardstock for each layout.  Sometimes I'll buy matching embellishments, but often I'll shop my stash.

The next step is to plan my layout. Sometimes it'll just come to me, or sometimes I'll look at online galleries and/or sketch books for inpiration. I like to draw a sketch right on my contact sheet. In today's example, I have a piece of paper that's a frame shape that I want to incorporate, so I'll sketch that in, too. I draw a dotted grid at the 1/2 and 1/4 marks, knowing that those are 3" increments.  This is a step that is great for when you're travelling, as you only need a pencil and these contact sheets.

Now I look at the sketch to see what size photos I want (I need 1 4x6 and 4 smaller photos) and select the photos I want to print. I circle the photos and note what size I need. Sometimes, I'll use PSE to crop the photos a bit, or do a little photoprocessing to fix the white balance, remove weeds from my garden, etc. :)  Then I can go to PhotoSheet and resize as needed and upload the photos to my printing site (Costco, Blacks, etc).

My paper, this sketch, the photos, and any embellishments all go into a Cropper Hopper 12x12 folder. You could also use an XL Ziploc bag. If I have more time, sometimes I'll even cut a title on my Cameo, or print my journalling and stick it in there.

Here's what a finished kit might look like...


These can be packed away for the real crop time! I find that if I invest my time in the planning, then I'm so much more productive when I'm cropping. I'm a slow scrapper as it is, so every little bit helps.

Often, my layout ends up completely different than the sketch I draw on this paper, but I think that's just part of the process. And enjoying the process is the whole point of this hobby, right?

Some favourite bits:


And the end result:


I might go back and add a title one day, but right now, I like to just think that this one is "Joy."

Materials: patterned paper and embellishments - LYB, push pins, fabric buttons - Maya Road

Saturday, June 9, 2012

Jumping Jills


So, I had been jonesing for a while about getting a new camera. I've never scrapbooked so much before, and I was actually running out of photos that I wanted to scrap. The logical conclusion was that I needed a new camera, right? So, one thing led to another... sale at Best Buy... blah blah blah... I have a new camera.

The first day I had it, I took it to my son's baseball game and took some photos of my daughter and her friend. I used the "vivid" mode, so the colours really pop.

Here's the layout after I had the "structure" built. I used the Jillibean Pasta Fagioli line. There's some paper that has a filmstrip all over it, so I cut out a couple of strips of it. I cut an extra strip of the brown border to go alongside the smaller photos. The larger filmstrip border is cut using the Tim Holtz filmstrip Sizzix die.


So, at this point I know that I need "more" on this page, but I'm not sure what. I gathered a bunch of flowers and my Candi. The white flowers and Candi are coloured with Copic markers to match the layout. Still needs something else...


Time to get out the washi. :) I accordion folded a long strip


Then slooooooowly pull it partially apart so that some of the fold remains, but some of it's flat, too. Hard to describe, but the washi tape just does this. You can see below how it just pulls nicely apart, but with little tabs.


Adhere it to a circle (or scalloped circle). I found it easier to do this by working on the back side, but if you put some glue on the back of the circle, it would look really cool adhering it to the opposite side, too.


I added some fabric buttons on top to cover up the finished edge. And after all that, I decided that it was too big for my layout, so I cut it and put half on two different spots.


I added more flowers, and a little bit of washi under a flower next to the title, in order to complete a visual triangle of the red colour. The title is made of Jillbean letter stickers on top of some dark brown cardstock, and then cut out. It was necessary to do this so that the title popped enough.  Some blue Studio Calico rubons added for good measure. NOW it's enough. Aaaaaaand....  done. :)

Materials:  Jillbean Pasta Fagioli patterned paper, Bazzil cardstock, Tim Holtz filmstrip die, Candi (Icing Sugar), Copic markers, Nelly Snellen flower punches, Cosmo Cricket washi tape, Maya Road Canvas Button Pieces

Friday, June 8, 2012

Long time, no post!

Sorry it's been so long.... I just started back to work 3 days/week. That plus baseball tournaments, physio for my son, and a little trip over to sunny Las Vegas, I haven't been able to squeeze in much time to scrap! But, today, I woke up this morning inspired! Hopped onto my computer to blog and.... no internet!!! Seems to be ok now, but who knows how long it will last!

So, quick, while the kids are out riding their bikes, I'll happily blog away...

I want to share a layout I made with the American Crafts Amy Tangerine paper and fabric tags. Love the bright colours in this release. It was so hard to pick the paper.... so many that I liked!


Just for the record, I purposefully spelled trampoline as "tramapoline" due to a Simpson's reference (and now that I've googled it to link it, I see that it should have been "tramampoline" ugh!). Still, it's my own scrapbook and it can be our little secret... shhhh!


One of the papers is a page full of frames, so that led me to my page inspiration of having it look like an art gallery. I used PhotoSheet to resize a bunch of photos and fussycut the frames out.


For the main photo, I didn't have a frame large enough, so I Frankensteined a piece of paper to fit.  First, I cut out two opposite corners, leaving lots of excess. I made sure that the pattern on each side was at least the length and width of my photo (6x8 in this case).


Here's how it looked roughly.


Then I used my trusty washi tape to secure the corners in place. I fiddled with it a bit to try to make the pattern as seamless as possible. The colour match was a bit off, but I find I worry less about this than I used to.


Once I had the corners matched up better, I adhered the frame together, and fussycut the remainder of the scallops.


The title is cut on the Cameo. I wrote the title out and offset it a bit with black cardstock to create a border around it. The actual pink letters were separated out and rotated so the the pattern would be random directions when it was completed.

That's it, that's all! Now onto the next project!

Materials:  American Crafts Amy Tangerine paper and fabric tags, Bazzill cardstock (what? that's it?)